C4BG0ZF1 - 607
FOREWORD STRUCTURE
The body repair methods have been studied to enable the repairer to perform quality work in the best possible conditions .
1 - THE MAIN OPERATIONS ARE BROKEN DOWN UNDER THE FOLLOWING HEADINGS
1 - 1 - COMPLEMENTARY OPERATION(S)
All the operations which must be performed in addition to the actual repair .
1 - 2 - IDENTIFICATION OF REPLACEMENT PARTS
All the parts to be ordered for the actual repair .
1 - 3 - PART(S) REQUIRED TO CARRY OUT THE OPERATION
Identification of the actual repair parts after cutting or removing certain components .
1 - 4 - PREPARATION OF NEW PARTS
Descaling of mating edges before welding .
Definition of drilling or cutting of components for partial replacement .
1 - 5 - CUTTING OUT
To be performed on the damaged components as indicated .
1 - 6 - SEPARATING
Rectifying, flattening and disking the mating edges .
Application of welding primer to the mating edges (on both body shell and new components) .
1 - 7 - ADJUSTMENT
Offering up components for alignment .
Check .
Adjustment .
1 - 8 - WELDING
Welding on the lines provided using appropriate equipment .
1 - 9 - FINISHING
Loading of surfaces which require careful finishing .
1 - 10 - SEALING
Application of mastic as indicated .
1 - 11 - PROTECTION
Application of anti-chip compound to the areas indicated .
Spraying liquid wax into box members .
1 - 12 - FOAM OPERATION
Injection of expanding foam into the areas indicated .
IMPERATIVE : on completion of the work: check the operation of electrical equipment, check the closing of movable panels, clean off all marks .
2 - WELDING
From 03/2000, All the new models produced will have improved quality thicker panels, and at least 95 % of them will be galvanised on both sides, with a 12 year anti-corrosion warranty .
This involves certain constraints of installation and resistance welding equipment, as follows :
3 - REMINDERS ABOUT WELDING
3 - 1 - VOLTAGE DROPS
In order to avoid voltage drops involving poor resistance of the weld spot concerned, never have overloaded lines, an inadequate wire diameter and supply sockets sited too far from the circuit breaker .
An under-supplied machine, even if highly efficient, cannot guarantee acceptable welding .
In order to guarantee a correct supply to the welding stations, it is absolutely essential to have a line with wires of 6 mm2 or 10 mm2 if more than 50 m .
Maintenance of the line :
3 - 2 - PRINCIPLE OF RESISTANCE WELDING
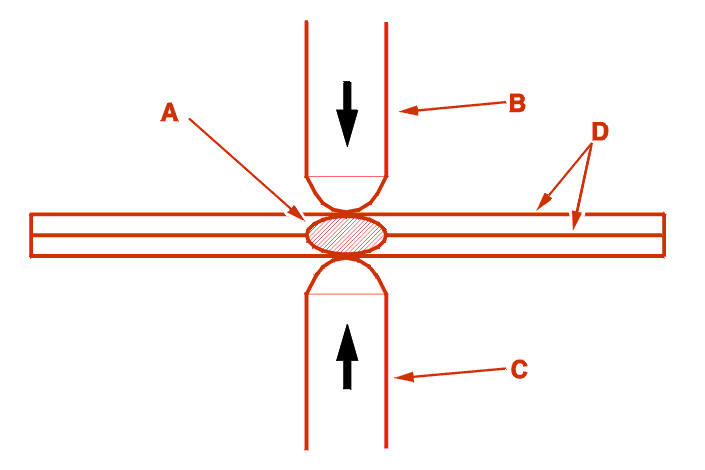
This consists in obtaining a fusion core with a diameter specified in terms of the thickness of the panels .
Electrical resistance welding uses the release of heat produced by a high current passing through and requires the application of a load between the parts to be welded .

A = Fused core .
B = Top electrode .
C = Bottom electrode .
D = Parts to be welded .
WARNING : welding a single surface (so-called core sample welding) is not a reliable procedure; it should not be used in body repair .
3 - 3 - DIAMETER OF ELECTRODE POINTS
The choice of electrode points varies depending on the thickness of the panels to be assembled : (Diameter = Thickness x 2 + 3 mm) .
3 - 4 - SETTING OF ELECTRODE HOLDERS
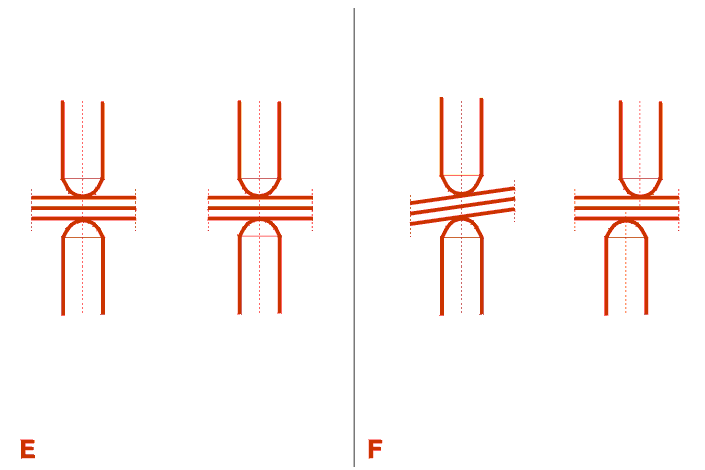
Select electrode holders in such a way as they permit the passage of the clamp, while being as short as possible .
Incorrect adjustment would risk distorting or perforating the panels and having a spot weld of insufficient strength .
The electrodes must be :

E = Correct .
F = Incorrect .
3 - 5 - STRENGTH OF THE WELD SPOT

Diameter A = Diameter of the core .
Before welding, carry out tests on sample panels which are identical and in the same order as those to be welded .
Check the strength of the weld spots, in order to determine the current and pressure necessary to obtain good quality (too low a current or pressure gives a spot that is stuck and not welded) .
When removing spot welds (by extracting with pliers) the formed core remains on one of the panels (the thickest) and produces one hole on top of the other .
A spot weld is incorrect if :
The removed spots (cores) have a diameter of 4 mm for a reference panel less than 1.5 mm thick, and diameter 6 mm for a reference panel from 1.5 mm .
The diameter is measured at the base of the core after separation of the panels and is determined acccording to the reference panel .
Reference panel :
Examples .
| assembly | reference panel | required core diameter |
|---|---|---|
| 0.7 + 0.2 + 1.0 | 1.0 mm | 4 mm |
| 0.8 + 1.5 + 1.5 | 1.5 mm | 6 mm |
| 1.8 + 1.0 + 1.2 | 1.2 mm | 4 mm |
| 1.8 + 0.8 + 1.5 | 1.5 mm | 6 mm |
3 - 6 - QUALITY OF WELD SPOT
The elements determining the quality of the weld spot are :
Visual check of the weld spot .
This consists in checking that the points :
3 - 7 - PROTECTION
WARNING : in order to avoid any future problem after repair or replacement of a panel part, ensure there is satisfactory protection of the various surfaces, this is to obtain characteristics identical to the original, ensuring the quality of the repair warranty against corrosion .
IMPERATIVE : for this, use an approved weld primer between the panels to be assembled .
3 - 8 - SAFETY
Observe the safety and fire rules .
For welding galvanised panel parts, work in a ventilated area .
Coat the equipment with individual appropriate protection .
4 - CORROSION PROTECTION
IMPERATIVE : in order to adhere to the 12 year anti-corrosion warranty, observe the following recommendations .
4 - 1 - SURFACE TREATMENT
WARNING : the operation starts after structural work on bare metal .
Adequate sanding of the welded joining areas (rear quarter panel, flange area,....) .
Degreasing with solvent of the surfaces to be treated in order to make them ready to receive the electro-zinc plated protection .
To carry out the electro-zinc plating operation, a deposit of 10 is required, corresponding to the initial treatment by the manufacturer .
Rinse the treated surfaces with water .
Super finish sanding with abrasive pad .
Wipe, Dry .
WARNING : do not touch treated surfaces with bare hands .
4 - 2 - APPLICATION OF UNDERCOATS (SURFACE WITH DISTORTION)
Application of a special zinc polyester mastic (9726.85) .
Sanding .
If necessary, Finishing mastic .
Sanding .
Application of a primer in the area to which the mastic has been applied .
Application of a two-part compound primer over the whole of the repaired area .
Stoving 30 minutes at 60 ° c .
Allow it to cool .
Sanding, Wipe .
Reminder : Use approved equipment for re-applying zinc plating .
4 - 3 - APPLICATION OF UNDERCOATS (SURFACE WITHOUT DISTORTION)
Application of a primer on a zinc-plated surface .
Application of a two-part compound primer over the whole of the repaired area .
Stoving 30 minutes at 60 ° c .
Allow it to cool .
Sanding, Wipe .
Reminder : Use approved equipment for re-applying zinc plating .
4 - 4 - SEALING
Apply sealing seams (e.g: wing / door junction flange area) .
Underbody underseal .
Dry .
4 - 5 - FOAM OPERATION
Injection of expanding foam into the areas indicated .
4 - 6 - PAINT - PROTECTION
Carry out normal paint procedure .
Stoving 30 minutes at 60 ° c .
Allow to cool and inject wax into hollow areas, making sure that the areas adversely affected by the weld are uniformly covered with wax .